Backup and Restore the 16 MiB Flash
The RTL8196E SPI NOR stores the Realtek bootloader, Linux kernel, root filesystem, and persistent data. A complete 16 MiB backup is the recovery point for a failed install and the only way to return exactly to a device's original vendor state.
Make a backup before the first flash, before a board/kernel experiment, and before a manual partition update. Store it outside the repository and do not publish it: vendor data, identifiers, credentials, or network configuration may be present.
Choose a method
| Gateway state | Method | Writes to gateway? | Requirements |
|---|---|---|---|
| Linux running with known root credentials | backup_gateway.sh |
No | Ethernet + SSH |
| Linux credentials unavailable, bootloader works | Bootloader FLR |
No | UART + same-L2 TFTP |
| Bootloader corrupted or flash chip inaccessible in circuit | External SPI programmer | Read is safe; restore writes | Desoldering and SPI tools |
For a stock Tuya image, the SSH service is normally on port 2333; using it still requires valid root credentials. If those credentials are unavailable, use the serial bootloader read before installing the replacement firmware.
Verify every backup
A full image must be exactly 16,777,216 bytes:
Keep the hash next to the backup. Prefer two independent storage locations. Do not treat a set of zero-byte or short partition files as a successful backup merely because the script created a directory.
Method 1 — Backup over SSH
The repository-root script detects this project's SSH service on port 22 or the stock Tuya service on port 2333, reads every MTD partition, verifies its size, and concatenates a full image.
If the gateway uses the usual project address:
The output contains:
The script asks for SSH authentication as needed. It is read-only with respect
to the gateway. Review backup.log, confirm every partition reports [OK], and
verify the full image size and hash.
Method 2 — Bootloader FLR + TFTP
Use this before a first install when stock SSH credentials are unavailable, or when Linux no longer boots. It requires the RTL8196E serial console at 38400 8N1 and a computer on the same L2 subnet as the bootloader.
Enter the bootloader
From a running custom system:
From stock firmware or a broken Linux system, open the serial console, apply
power, and press Esc repeatedly until <RealTek> appears. See the
hardware/UART instructions.
The default bootloader TFTP address is 192.168.1.6. On another subnet, use
IPCONFIG <address> at the prompt or pass a supported address to a V2.7+
boothold command.
Read the complete flash
At the serial prompt, copy all 16 MiB from flash to RAM:
On the computer, download that RAM buffer from the bootloader TFTP server:
Verify the exact size and hash before leaving the bootloader or running an
install. FLR reads only; it does not change flash.
Restore a complete image
Restoring overwrites every byte of the device flash. Resolve the exact backup path, board, and file size before continuing.
Upload the image to RAM:
Then write RAM to flash at the serial prompt:
Do not interrupt power during FLW. The repository-root
restore_gateway.sh provides the same guided full-image workflow and performs
host-side checks before the write.
Partition-level commands
FLR and FLW use this form:
Current custom layout:
| MTD | Offset / size | FLR |
FLW |
|---|---|---|---|
| boot + config | 0x000000 / 0x020000 |
FLR 80500000 00000000 00020000 |
FLW 00000000 80500000 00020000 |
| kernel | 0x020000 / 0x1E0000 |
FLR 80500000 00020000 001E0000 |
FLW 00020000 80500000 001E0000 |
| rootfs | 0x200000 / 0x200000 |
FLR 80500000 00200000 00200000 |
FLW 00200000 80500000 00200000 |
| userdata | 0x400000 / 0xC00000 |
FLR 80500000 00400000 00C00000 |
FLW 00400000 80500000 00C00000 |
Original Lidl/Tuya layout:
| MTD | Offset / size | Purpose |
|---|---|---|
| mtd0 | 0x000000 / 0x020000 |
Bootloader + config |
| mtd1 | 0x020000 / 0x1E0000 |
Kernel |
| mtd2 | 0x200000 / 0x200000 |
Rootfs |
| mtd3 | 0x400000 / 0x020000 |
Tuya label |
| mtd4 | 0x420000 / 0xBE0000 |
JFFS2 overlay |
Prefer a complete full-flash backup. Partition-level restores are for users who understand the active layout and image headers.
Method 3 — External SPI programmer
Use an external programmer only if the Realtek bootloader cannot read/write the flash, for example when the console stays completely silent at power-on even though the serial wiring has been verified. It is the last-resort path: the flash chip, a GigaDevice GD25Q127C (16 MiB SPI NOR, green in the PCB photo), must be desoldered from the board.
A programming clip does not work on this board. Reading or writing the chip in circuit is not reliable; do not attempt it.
Hardware
- A CH341A USB SPI programmer (inexpensive and widely available). Use its 25xx SPI flash socket.
- A 200–209 mil SOP8 socket adapter. The GD25Q127C sits in the wide-body SOP8 package: a narrow 150 mil SOP8 adapter does not fit it. Seat the chip squarely in the socket with its pin 1 mark on the socket's pin 1 side.
- Flux and either desoldering braid or a small desoldering pump, to remove the chip and to solder it back afterwards.
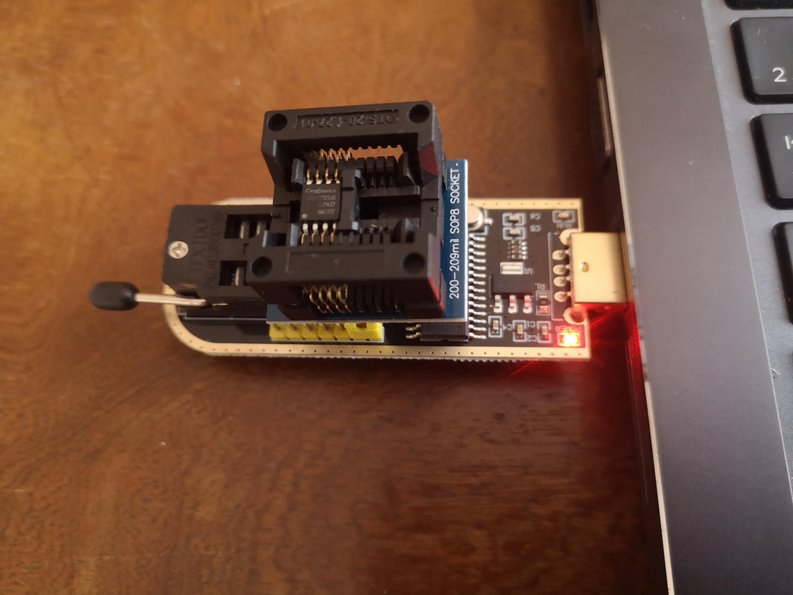
Software
flashrom is the open-source utility that talks to the CH341A: it identifies the SPI flash chip, reads its full contents to a file, and writes a file back with an erase, write and verify cycle. It runs on the Linux computer the programmer is plugged into; nothing runs on the gateway.
Most distributions package it:
Accessing the USB programmer usually needs root: if flashrom reports a
permission error or finds no programmer, run the same commands with sudo.
Detect the chip
flashrom reports the GD25Q127C as GD25Q128C (same JEDEC ID C8 40 18); use
that name in every command:
Expected output:
Found GigaDevice flash chip "GD25Q128C" (16384 kB, SPI) on ch341a_spi.
No operations were specified.
If the chip is not detected, check that it is correctly seated and oriented first. If the flashrom version packaged by your distribution still does not find it, install the latest version from flashrom.org.
Read (backup)
Read the chip at least twice and compare the hashes before anything else. The read also shows what is actually on the flash, which is worth keeping when diagnosing a failed install:
flashrom -p ch341a_spi -c GD25Q128C -r fullflash-read1.bin
flashrom -p ch341a_spi -c GD25Q128C -r fullflash-read2.bin
sha256sum fullflash-read1.bin fullflash-read2.bin
Different hashes mean an unreliable contact: re-seat the chip and read again.
Write (restore)
Only after matching reads should a restore be considered. Write either a
verified backup (Method 1 or 2) or an image assembled by ./build_fullflash.sh
at the repository root:
The output ends with:
Found GigaDevice flash chip "GD25Q128C" (16384 kB, SPI) on ch341a_spi.
Reading old flash chip contents... done.
Updating flash chip contents... Erase/write done from 0 to ffffff
Verifying flash... VERIFIED.
- This completely overwrites the chip.
- The image must be exactly 16 MiB (16,777,216 bytes) and belong to the same board: the bootloader it contains carries board-specific DRAM settings.
- The write takes several minutes; wait for
VERIFIED.before removing the chip.
Then solder the chip back, respecting its orientation, and power the gateway with the serial console connected: the bootloader banner confirms the restore.
Utilities
| Script | Purpose |
|---|---|
../../backup_gateway.sh |
Detect Linux type and create a verified SSH backup |
../../restore_gateway.sh |
Guide a full TFTP + FLW restore |
split_flash.sh |
Split a 16 MiB image into partition files |
scripts/restore_mtd_via_ssh.sh |
Restore a partition on original Tuya firmware |
Split a current custom image:
Split an original Lidl/Tuya image:
For installation failures, continue with the central troubleshooting guide.