First installation
This guide converts a gateway running its original vendor firmware to the open Linux firmware. It follows the most common case — a Lidl Silvercrest / Tuya gateway used as a Zigbee coordinator — and calls out the Sengled differences.
If your gateway already runs this project, do not repeat the hardware procedure; use the upgrade guide.
What you are about to do
The first installation is not a normal web update. You will:
- prepare a Linux computer and make a backup;
- choose the gateway's network settings and prepare its first-login settings;
- open the gateway;
- connect a 3.3 V serial adapter to the RTL8196E console;
- stop the boot process at the Realtek bootloader prompt;
- transfer a complete 16 MiB image over Ethernet with TFTP;
- boot Linux, secure it, then flash the separate EFR32 radio over the network.
The serial connection is normally needed only for this first installation and for disaster recovery. Routine upgrades use SSH and Ethernet.
Experienced-user checklist
Use this only if 3.3 V UART and bootloader TFTP workflows are already familiar:
- Clone the repository, install the host tools, and decide between DHCP and a static address. Prepare an SSH public key and the desired hostname/timezone.
- Back up the stock flash with
backup_gateway.shor bootloaderFLR. - On Lidl, connect J1 pin 2 to GND, pin 3 to adapter RX, and pin 4 to adapter TX; leave pin 1 disconnected. On Sengled, use its labeled UART0 pads and board-specific photo.
- Open a 38400 8N1 serial terminal with no flow control.
- Put the host and bootloader on the same L2 subnet; default bootloader IP is
192.168.1.6. - Hold
Escdown, apply power, and keep the key held until<RealTek>appears. - From the repository root, run
./flash_install_rtl8196e.shfor Lidl orBOARD=sengled-e39-g8c ./flash_install_rtl8196e.shfor Sengled. - After Linux boots, change the root password, install the prepared SSH key and
settings, then run
./flash_efr32.sh -y -g <gateway-ip> ncpfor the recommended Zigbee setup. On a stock Sengled G4, install the radio's Gecko bootloader first — its factory one has no menu and cannot be driven by the flasher (step 12).
The rest of this page explains every step and the reason behind it.
1. Check the board and choose the result
| Board | Installation command | Hardware notes |
|---|---|---|
| Lidl Silvercrest / Tuya | ./flash_install_rtl8196e.sh |
This page's default |
| Sengled Smart Hub G4 | BOARD=sengled-e39-g8c ./flash_install_rtl8196e.sh |
Different PCB and debug header |
Do not flash one board's full image onto the other. The bootloader contains
board-specific DRAM settings, so a mismatch can prevent the gateway from
starting. Lidl users should not set BOARD.
The board choice affects the RTL8196E image and the later EFR32 flash. The radio
mode is not selected while flashing the RTL8196E. After Linux is running,
flash_efr32.sh flashes the chosen radio application and generates the matching
/userdata/etc/radio.conf. For Zigbee2MQTT or ZHA, the later example uses NCP.
For Thread/Matter, multi-PAN experimentation, or a standalone router, read
Choose a radio mode before the EFR32 step.
2. Gather the hardware
You need:
- the gateway and its normal power supply;
- an Ethernet cable connected to the same local network as the computer;
- a USB-to-UART adapter with 3.3 V TTL logic;
- three female jumper wires;
- a way to make reliable contact with the unpopulated J1 header — normally a soldered 2.54 mm pin header, although suitable test hooks can also work;
- tools to open the screwless case without shorting or damaging the PCB.
An RS-232 adapter is electrically incompatible. Do not use a 5 V UART adapter. Do not power the gateway from the UART adapter.
3. Prepare the computer
The documented native environment is Ubuntu 22.04, including Ubuntu under WSL2. USB serial access under WSL2 may require USB passthrough. A normal Linux machine is the simplest option for a first flash.
Linux is a requirement, not a preference. The gateway's userdata image is
built with mkfs.jffs2 from mtd-utils, which exists on Linux only, and the
scripts assume GNU tool behaviour and bash 4. They refuse to start on anything
else rather than fail half-way. macOS is the case worth naming: it ships bash
3.2, and a run there stops mid-flow after reporting sizes that are not real.
If your computer runs macOS, or Windows without WSL2, run the scripts from a Linux machine on the same network. Any Linux box will do, including a Raspberry Pi, or a virtual machine whose network adapter is set to bridged mode. Bridged matters: the bootloader is reached by ARP and TFTP on the same network segment, so a VM behind NAT cannot see it, and neither can a container under Docker Desktop. The serial console can stay on your own computer — it does not have to be the machine that runs the flash.
Install the host tools, then clone the repository:
sudo apt update
sudo apt install git openssh-client fakeroot gcc mtd-utils squashfs-tools \
  tftp-hpa netcat-openbsd iproute2 iputils-ping python3 python3-venv \
  patch picocom

git clone --depth 1 https://github.com/jnilo1/rtl8196e-gateway.git
cd rtl8196e-gateway
The shallow clone downloads only the current release history, which is all an installer using pre-built images needs. The complete cross-compilation environment takes much longer and is also unnecessary for installation. Developers who need project history or plan to contribute should make a normal full clone and use the build environment guide.
xxd is not required: image verification deliberately uses od from Ubuntu's
base coreutils package. The scripts also rely on base-system tools such as
bash, tar, grep, sed, awk, find, dd, stat, and timeout, which
are present in a normal Ubuntu 22.04 installation.
4. Plan the persistent configuration
Do this while the gateway is still closed and working. It avoids having to make network and security decisions while the device is waiting in its bootloader.
| Setting | When it is applied | What to prepare now |
|---|---|---|
| DHCP or static IPv4 | During the RTL8196E image build | For static mode: an unused address, netmask, and gateway |
| Root password | Immediately after the first SSH login | A new password; never store it in the repository or an environment variable |
| SSH public key | Immediately after the first SSH login | The path to an existing .pub file, or generate one now |
| Hostname | Immediately after the first SSH login | A short name such as rtl8196e-gw |
| Timezone | Immediately after the first SSH login | A POSIX TZ string, for example CET-1CEST,M3.5.0/2,M10.5.0/3 |
| Zigbee/Thread radio mode | During the later EFR32 flash | The firmware family you want; do not create radio.conf yourself |
DHCP is convenient when the LAN already has a DHCP server; find the assigned address in its lease table. A static address is predictable, but it must match the LAN subnet and must not already be in use. The installer asks for this choice and bakes it into the RTL8196E userdata image.
The address the installer offers for the gateway is computed from the network of
the machine you run it on: it reads that machine's own address, netmask, and
default route, and proposes an address in the same subnet, host part 88. On a
192.168.0.0/24 LAN it therefore proposes 192.168.0.88, not the
192.168.1.88 used throughout this documentation. Every prompt can be
overridden, and the answers are remembered for later runs.
The bootloader's own address is a different matter, and on a first installation
it is not derived. The gateway will already be sitting at its bootloader,
which answers on the address compiled into it — 192.168.1.6 — and nothing can
move it from there. Step 9 explains what that means for your Ethernet setup. (On
a later upgrade the installer reboots the gateway into the bootloader itself and
hands it an address, so the derivation does apply then.)
To pin your own values instead — so no script ever has to guess, and so
backup_gateway.sh, flash_remote.sh and flash_efr32.sh can be run with no
address argument at all — copy the template at the repository root and edit it:
gateway.env is ignored by git. The examples in this documentation keep using
192.168.1.88; substitute your own gateway's address throughout.
If the administration computer has no SSH key yet, generate one before opening the gateway:
The current installer does not copy an administrator's public key or account settings into a first image. This is intentional for the root password, which should not appear in shell history or build files. The prepared public key, hostname, and timezone are applied in step 11 after Linux is reachable. The gateway generates its own SSH host keys on first boot.
The two flashes are independent: flash_install_rtl8196e.sh installs the main
Linux system and configures its network; flash_efr32.sh later installs the
radio firmware and writes the radio mode, baud rate, and flow-control settings
that match what it actually flashed.
5. Back up the original flash
Flashing the Linux system replaces the complete 16 MiB SPI flash. Keep a backup outside the repository so the original firmware can be restored later. Images built or backed up by the scripts carry a CRC trailer that the V3.1 bootloader checks before writing; see Upgrading if a restore is refused.
If you have SSH access to the stock firmware
Find the current gateway IP in your router's DHCP leases, then run:
./backup_gateway.sh --linux-ip <current-gateway-ip> \
  --output /path/outside/the/repository/gateway-backup
The script detects this project's SSH service on port 22 or the stock Tuya
service on port 2333. Stock SSH backup requires the gateway's root credentials.
At the end, verify that fullflash.bin is exactly 16,777,216 bytes:
If you do not have stock SSH credentials
Continue through the UART steps below, enter the bootloader, and make the backup
with FLR before running the installer. The exact commands are in
Backup and restore — Method 2.
Entering the bootloader and reading flash do not modify it.
6. Open the gateway and connect the serial console
Lidl Silvercrest / Tuya
Disconnect the normal power supply before opening the case or changing any wire. The Lidl case has no screws; eight plastic clips hold its edges.
The cyan rectangle in the existing PCB photo marks the vertical J1 connector:
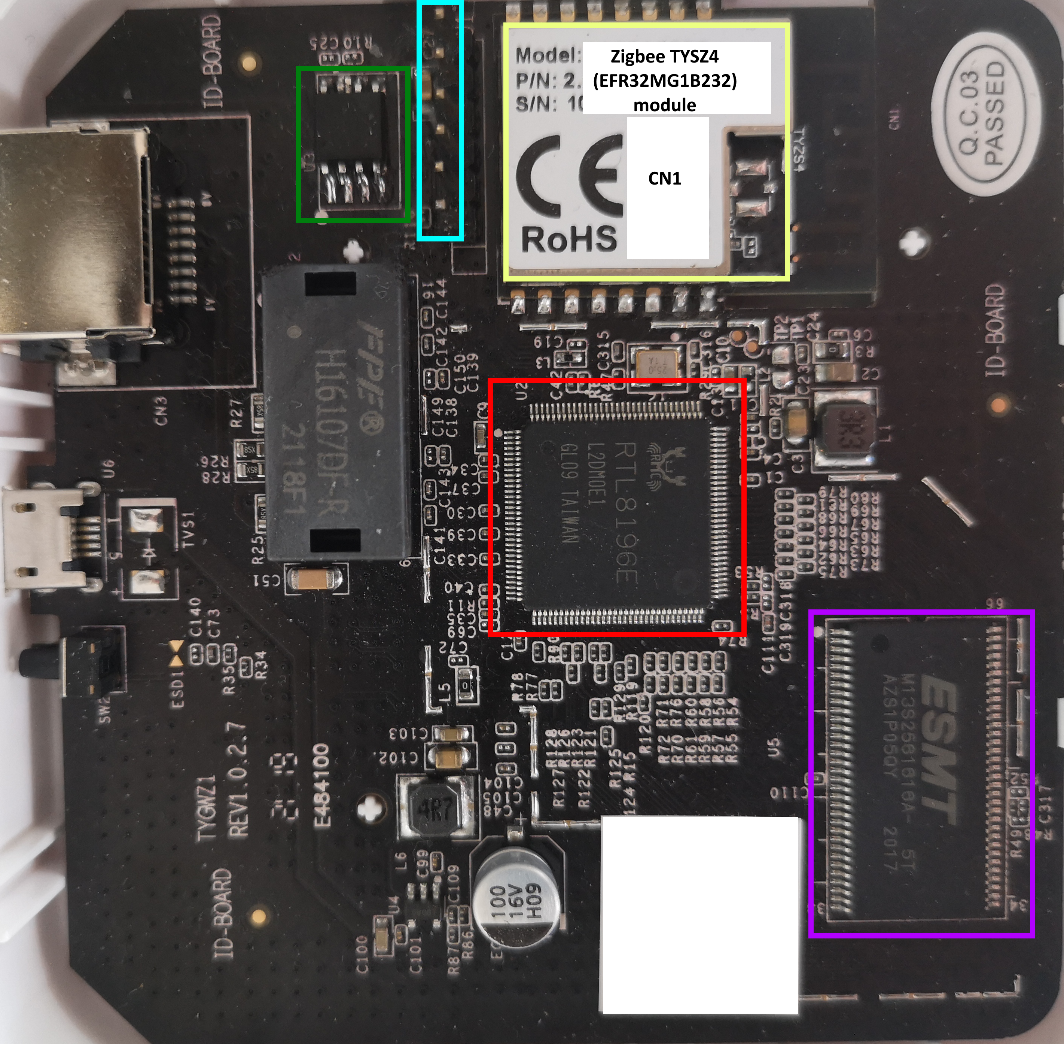
J1 is a six-pin combined serial/SWD header. Pin 1 is the bottom pin in the documented board orientation.
| J1 pin | Gateway signal | Connect to UART adapter |
|---|---|---|
| 1 | 3.3 V VCC | Do not connect |
| 2 | Ground | GND |
| 3 | RTL8196E serial TX | RX |
| 4 | RTL8196E serial RX | TX |
| 5 | EFR32 SWDIO | Do not connect |
| 6 | EFR32 SWCLK | Do not connect |
TX and RX are crossed because each device's transmitter connects to the other device's receiver. Power the gateway only with its normal supply. More board details are available in the Lidl hardware reference.
Sengled Smart Hub G4
The Sengled PCB does not use the Lidl J1 layout. Its back side has an annotated
RTL UART0 group with RX, TX, GND, 3.3V, and 5V pads. Connect PCB TX to
adapter RX, PCB RX to adapter TX, and GND to GND; leave both voltage pads
disconnected. Use the
Sengled photograph and instructions.
7. Open the serial console
Connect the USB-to-UART adapter to the computer and identify its device, often
/dev/ttyUSB0. Open it at 38400 baud, 8 data bits, no parity, one stop bit, and
no flow control:
If access is denied, fix the host's serial-device permissions rather than
running the whole flashing workflow as root. With picocom, Ctrl-A, then
Ctrl-X, exits the terminal.
No readable output usually means TX/RX are reversed, GND is missing, the wrong serial device is open, or the adapter is not using 3.3 V logic. See Troubleshooting before proceeding.
8. Enter the Realtek bootloader
Keep the serial terminal open. Remove power from the gateway, press Esc and
keep the key held down, then restore power. Hold the key until this prompt
appears:
Holding the key before power reaches the board is what makes this reliable. The
bootloader acts on the first character already waiting on the line, and keyboard
auto-repeat guarantees that character is Esc. Pressing the key only once
serial output has begun often misses.
If Linux starts instead, see
Cannot enter the bootloader,
which covers both power arrangements and what to check when Esc has no effect
at all. Do not run flash commands until you have made the backup from the
previous step or deliberately accepted that no original backup will exist.
9. Prepare the Ethernet path
The bootloader provides a TFTP server at 192.168.1.6. That address is
compiled into it and does not follow your LAN, so this step is needed whatever
subnet you are on. The computer must reach it directly on the same Ethernet
segment; a routed path is not enough.
If the computer already has an address such as 192.168.1.10/24, no additional
network setup is needed. Otherwise add a temporary secondary address to the
interface connected to the gateway:
Choose an unused host address. Do not assign 192.168.1.6 to the computer; that
address belongs to the bootloader. The install script checks this path and
prints an actionable error if the bootloader would be reached through a router.
Advanced users can set another bootloader address with --boot-ip, but the
stock bootloader may still require IPCONFIG on the serial console. The
install reference
covers non-default subnets.
10. Flash the Linux system
Leave the gateway at the <RealTek> prompt. In a second terminal, from the
repository root, run:
# Lidl / Tuya reference board, Linux 6.18
./flash_install_rtl8196e.sh

# Sengled Smart Hub G4
BOARD=sengled-e39-g8c ./flash_install_rtl8196e.sh
The script:
- checks the required host tools and bootloader network path;
- asks for DHCP or static network configuration;
- assembles and verifies the complete 16 MiB image;
- uploads it over TFTP;
- detects whether the bootloader can flash automatically or guides you through
the stock
FLWcommand.
Read each confirmation before accepting it. Do not disconnect power during the write. The userdata region can take one or two minutes to write on the stock bootloader.
On the first boot after replacing an old bootloader, the gateway can enter a boot loop because the old loader left Ethernet DMA active for that one handoff. If that happens, unplug it for a few seconds and power it on again. The new bootloader prevents the problem on subsequent boots.
11. Configure and secure Linux
The gateway uses the DHCP address or static address selected during the install.
The installer prints that address when it finishes, and records it in
.gateway-state at the repository root. If you chose DHCP, look the address up
in the router's lease table — the gateway announces itself as rtl8196e-gw.
Wait about 30 seconds, then connect:
The initial password is root. Change it immediately:
Verify the board, kernel, and network:
From the administration computer, install the public key prepared earlier:
On the gateway, set the desired hostname and POSIX timezone. These examples retain the shipped defaults; replace their values as needed:
printf '%s\n' 'rtl8196e-gw' > /userdata/etc/hostname
printf '%s\n' 'CET-1CEST,M3.5.0/2,M10.5.0/3' > /userdata/etc/TZ
There is no need to reboot just for these settings yet: the EFR32 flash in the next step reboots the gateway. If you postpone the radio flash, reboot manually to apply the hostname.
If a temporary host address was added earlier, remove it after the gateway is back on the normal LAN:
12. Choose and flash the EFR32 radio
The Linux flash does not replace the firmware on the separate EFR32 radio. This is where the radio mode is selected.
Sengled G4 only: install the radio's Gecko bootloader first
Lidl units skip this subsection and go straight to the application flash below.
On a stock Sengled G4 the radio still runs Sengled's own Gecko bootloader, which
has no menu: once entered, it starts an XMODEM receive immediately and emits C
once a second. flash_efr32.sh drives universal-silabs-flasher, which speaks
that menu (1 = upload, 2 = run), so on a factory G4 it has nothing to talk to
and cannot perform the first application flash. Install this project's
bootloader once with a plain XMODEM client; from then on flash_efr32.sh handles
applications and any later bootloader update by itself.
The transfer travels over the gateway's UART bridge, so the RTL8196E side has to be running — at this point in the guide it is. On the administration computer, add the XMODEM client:
On the gateway, park the bridge where the bootloader lives, then pulse the hardware entry pin. Nothing else may hold TCP port 8888 during the transfer:
SYSFS=/sys/module/rtl8196e_uart_bridge/parameters
echo 115200 > $SYSFS/baud
echo 0 > $SYSFS/flow_control
echo 1 > $SYSFS/blmode_pulse
Both settings are load-bearing: the bootloader's XMODEM path runs at 115200 with
no flow control, and the G4 wires no RTS/CTS, so the bridge defaults to software
flow control on that board — where it strips bare 0x11/0x13 bytes out of the
radio's byte stream, which a raw XMODEM transfer cannot survive. The two writes
are runtime-only; a reboot restores the normal settings.
Send the image from the repository root:
sz -X -o --tcp-client <gateway-ip>:8888 \
  2-Zigbee-Radio-Silabs-EFR32/23-Bootloader-UART-Xmodem/firmware/bootloader-uart-xmodem-2.4.3-sengled-e39-g8c.gbl
sz says very little. It prints the connection line and Give your local XMODEM
receive command now., then goes quiet for the length of the transfer and ends
without announcing anything — the factory bootloader is already receiving, so
there is nothing to answer that prompt. Silence here is the normal course.
Installing a bootloader erases the application, because the incoming image is
staged inside application space. The radio has no firmware until the next step
gives it one, so continue straight to the application flash. That flash is also
where the transfer is confirmed: it reports the bootloader version it finds, and
version 2.4.3 means the new one is in place. Nothing before that point tells
you — the factory bootloader announces no version of its own.
Do this once. Repeating it on a radio that already runs this project's
bootloader erases the application without installing anything: the Gecko
bootloader silently declines an image whose version is not strictly newer than
the one running. flash_efr32.sh refuses that case before anything is sent; a
raw XMODEM transfer has no such guard.
The reasoning, including the memory map behind it, is in Gecko bootloader — first install over a factory bootloader.
Flash the radio application
For the recommended Zigbee2MQTT/ZHA setup, install the NCP firmware:
# Lidl
./flash_efr32.sh -y -g <gateway-ip> ncp

# Sengled Smart Hub G4
BOARD=sengled-e39-g8c ./flash_efr32.sh -y -g <gateway-ip> ncp
The first run creates a Python virtual environment and may download the pinned
flasher dependency. The script detects the running radio protocol, enters the
Gecko bootloader, flashes the application, and reboots the gateway. On every
successful application flash it generates or updates radio.conf from the
firmware actually installed, including the mode, UART baud rate, and board
flow-control setting. Do not pre-create or guess this file.
After the gateway returns, verify the generated state:
Do not start Zigbee2MQTT or ZHA while flash_efr32.sh is running: only one TCP
client can own port 8888 at a time.
13. Connect Zigbee2MQTT or ZHA
For Zigbee2MQTT, add:
For Home Assistant ZHA, select an EmberZNet radio and use this serial-device path:
Start the coordinator and confirm that it reports the Ember/EZSP radio without repeated connection errors. The gateway accepts only one bridge client, so do not point ZHA and Zigbee2MQTT at the radio simultaneously.